byc Thermostat
Last month, I bough a few cheap underfloor heating thermostats with touch screen. These thermostats are available from a number of sources under different names such as BTSKY, Jago, Prodeals, ProTouch, SM-PC, etc. The thermostats work with electrical and hydronic or water-based underfloor heating systems (the latter is what I am using it for). Because I am very happy with those thermostats and because they are fairly common and available through various channels, I decided to write about these thermostats. In total, I ordered 4 devices of which I have 2 sets of 2 identical devices (byc07 and byc71). Judging from pictures on the web, there may be other variants of the devices available as well.
DISCLAIMER: Before I continue, I would like to stress one more time that I do not take any responsibility for the information contained herein. It is your responsibility to double-check any figure herein, double-check that they apply equally well for your situation, and double-check that they cannot do any harm whatsoever. I am not responsible for you burning down your flat or house by following (or not following) the instructions below. If you do not understand any part explained herein or cannot double-check any of the information provided please seek help from a certified electrician.
Differences
Generally speaking, the two flavors of the thermostat are very similar and the shops where I ordered mine from did not differentiate between these two flavors. They vary in the place where the temperature sensor is located, the mounting options and their disassembly. Both flavors are mentioned in the user manual I got with it. Interestingly, the thermostat documented in the manual as byc71 displays byc07.50 when the device is turned on and the device documented as byc07 displays byc71.18 when the device is turned on. In the following, I will use the identifier displayed by the thermostat itself for identifying them. I trust that more than the manual.
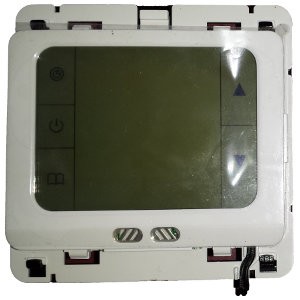
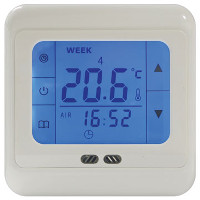
- byc07.50 (left)
- This thermostat can be identified by a little hole on the lower right in the outer frame. This is where the temperature sensor is located. It is not located behind the silver grill where one would expect it. The advantage of this placement is that it is farther away from the electronics of the thermostat but probably located closer to the wall where it is mounted which may also influence the sensor. Apart from that, its frame provides only two holes for mounting.
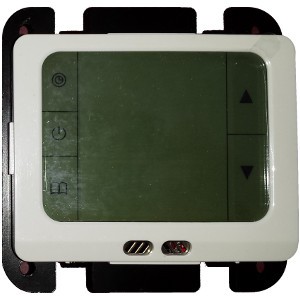
- byc71.18 (right)
- This thermostat can be identified by four mounting holes in the corners in addition to the two mounting holes in the middle on the sides. The temperature sensor is located in the middle under the silver grill. Also the touch screen has some room in these thermostats and can be moved around a bit with your fingers.
The batteries of the byc71.18 (used for storing the clock in case of a power outage) were flat whereas those of the byc07.50 were still full. I take this as an indication that the byc07.50 devices were produced later than the byc71.18 devices and probably are the newer devices.
Power terminals
The devices have the following screw terminals on the underside:
- N, L
- These two terminals are used for supplying power to the device (N=Neutral=Null, L=Line=Live). The byc71.18 accepts 85-250V at 50/60Hz as input whereas the byc07.50 only accepts 230V at 50/60Hz as input.
- N1, L1
- These two terminals are intended for the underfloor heating unit. N1 is connected to N and L1 is connected via a relay to L when the thermostat decides that the underfloor heating is to be turned on. The maximum rating is 16A, some vendors however recommend to load it with a maximum of about 10A which doubles the lifetime of the relay contained in the thermostat.
- T1, T2
- These terminals are for the external temperature sensor, which I did not need.
Before mounting either thermostat, it would be good to simply connect the thermostat to power to check whether it works in principle. Also play around with the temperature setting and listen whether you here the relay switching when the unit should turn on/off the heating. By default there is a 1 degree Celsius hysteresis.

Old Bimetal Thermostat
My old thermostat has neutral (N, blue) and line (L, red) and connects another wire (green) to line (L) when the underfloor heating should be turned on. This can be verified easily with a multi-meter. When measuring the voltage between blue and red it is 230V irrespective of the thermostat’s setting. When measuring the voltage between blue and green, it is 230V when the air temperature is lower then the target temperature set by the thermostat, 0V otherwise. The yellow terminal is the inverse to the green one 0V when the air temperature is lower, 230V otherwise. The green terminal goes to an actuator that opens a valve when connected to 230V. The actuator consumes 3W which maps to about 13mA which is far less than the 16A the thermostat is rated for.
Hence, blue corresponds to N (or N1), red corresponds to L, and green corresponds to L1. There is no correspondence for yellow.
Disassembling
Disassembling the units is fairly straight forward and the manual is quite accurate. The byc07.50, one first has to remove the outer frame with some force but gentle enough not to break the plastic hooks. Next lift the plastic buckle on top to be able to slide off the metal plate below which subsequently can be mounted wherever the thermostat shall be placed. If, one ever needs to replace the battery (not explained in the manual), one has to use flathead screwdriver to push the lower two of the four hooks down to be able to lift off the display with the microprocessor unit from the power adapter. When doing that, be careful, because there is a ribbon cable that connects the microprocessor unit with the power adapter below. Next simply replace the battery with a battery of type CR1220.
The byc71.18 is disassembled slightly different. First remove the outer frame, this goes a bit more gently on this unit. Next you need to use a flathead screwdriver to remove the display with the microprocessor unit from the power adapter (essentially the step required for replacing the battery of the byc07.50. Again be careful, because of the ribbon cable. If you need to replace the battery, now would be a good time to do so.
Mounting
The byc07.50 can only be mounted with the holes on the left and right side. In my case, the frame where my old thermostat was mounted on has two screws at the top and the bottom and a kind-of mesh behind it. That means that the frame my previous thermostat was mounted on had two be rotated on the mesh behind removed (to make place for the power adapter protruding on the back of the byc thermostat.
The byc71.18 can be mounted either with the holes in the corners or through the holes on the side. Hence the same procedure as for the byc07.50 can be used, or alternatively, do away with the frame altogether and use the holes in the corners which also looks nicer.
Programming
Both devices I have are programmed using the same way.
The thermostat settings can be changed by pressing the book icon after power the device on (while the device name is printed on the display). Cycling through the settings, you can change the temperature offset (-1.9C is the correct value for my units), the calendar mode (5+2, 6+1, 7), anti-freeze protection, sensor mode (internal, external, both), external sensor temperature limit (when the external sensor reaches that temperature, the device will turn heating off), internal sensor hysteresis, same for external sensor, status after power failure (off, on=same-status-as-before).
After the unit is turned on press the book icon for two seconds to program your weekly schedule. There 6 stages through which the thermostat will cycle through every day during the week and another 6 stages for the weekend. For each stage, you cab decide the time the stage becomes active and the temperature the thermostat should control to. All 6 stages need to be programmed. If you don’t need one, just set it to the same values as the previous one.
Pressing the book icon, will turn on and off the weekly program.
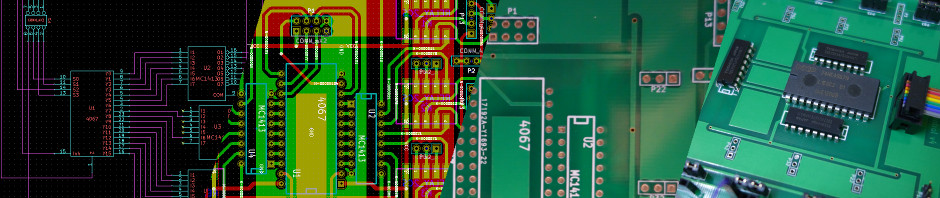
Microprocessor
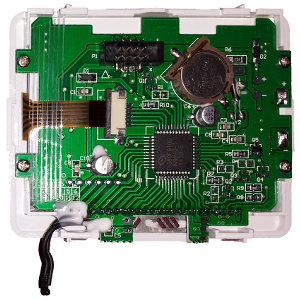
byc07.50 PCB
The thermostat is controlled by a G80F910D microprocessor. It seems this is simply an Intel 8051 microprocessor with a LED driver attached to it. In case you decide to redo the devices firmware or use it for other purposes. Google will point you to a manual in Chinese(?). The most important part is probably the pin-out. If you cannot find the Chinese one, I have a copy thereof, just let me know. If you find an English manual, please let me know.
Looking at the lower left on the PCB, we can identify a “calendar” that probably can be used for marking the production year and month. While the byc07.50 lists 13-14-15-16, the byc71.18 lists 10-11-12-13, another strong indication that the byc07.50 is the newer model.
Other variants
So far these are the only two variants I know. If you find other ones in the wild and think this might be helpful for others, please let me know and I will update this blog entry.
Hi,
I’m happy to find your article. I use this thermostat since 3 months. I have 2 old one and a new one).
One problem: they lost their programming, even with a charged battery, in case of outage. Not lost the time, but lost the weekly programming (in the 2 versions).
Best regards,
JC
Hi JC,
The programming of mine is not lost, I just checked with all four of my thermostats (three with a good battery, the fourth with a dead one). This is also the expected behavior as the programming is most likely stored in flash memory of the micro controller. Why yours loose the programming I can only speculate. Maybe you have a slightly different batch with different firmware? If there is anything you want to compare between your and my units to figure out the problem, let me know if you have any ideas…
Otherwise thanks for pointing out to other readers that there may be units that do not work as well.
Best, Thomas
Hi Thomas,
I took a look at my thermostat.
I have two BYC 07.50 a 71.18 BYC and the last is a BYC71.19.
When I bought the units, all batteries were dead. So I have changed.
I checked with a multimeter that I have the right tension, but perhaps
they were old …. I’ll change back the batteries. Maybe it’s just that.
Best regards,
JC
Goes antifreeze shut down? For fw. 71.18 function but does not respond.
Thx
Petr
Hi Petr,
I don’t use the anti-freeze function. I cannot help you there.
Thomas
hello
I have a problem with a floortouch thermostat, BYC07. HE 16a
the instructions given with it could be a lot clearer.
it was installed a couple of months ago, and was working ok.
Now it has stopped working.
simple steps to find out possible problems and solutions please!!!
thanks
Hi Doug,
Yes, the manual is not really the best. What do you mean with stopped working? You mean no display, nothing? You may want to double-check your cabling with a voltmeter. If that works out fine, probably check whether the “power-supply” is broken. You can do that by taking off the PCB and checking out he plug that connects the PCB with thebottom half (the power supply). Sorry don’t know the pin-out, so not really sure that helps. 🙁
Worst case you may want to consider just getting a new one. Mine are still working fine here. In any case, good luck,
Thomas
Tom
Thank you for producing such an excellent article on these thermostats, I have also purchased several that are currently being used with electric panel heaters.
one thing that I have noticed is that the hysteresis appears to be on the wrong side of the set-point, if set to say 16 deg the heating does not actually turn off until 17 deg is reached. it’s not really a problem as you just set the temperature a little lower.
Brian
Hi there
Thanks for writing this its very helpful.
Does anyone know where I can get the manual for these, I have lost it and have no idea how to program them any more.
Its here: http://www.heatnet.nl/th99-engelse-handleiding.pdf
Hi and thanks for the write-up.
I’m just considering buying a couple of these.
Could you tell me if there are any “Advance” or “Boost” controls, ie. can you manually/temporarily adjust the temperature, or would you have to adjust the program each time?
You can switch the thermostat to manual, setting it to a given temperature and lateron you can return to the previously programmed setting. In that sense, yes it provides a boost. If you want it to go back automatically to the programmed setting, that it would not do.
Thanks for the interesting article. One thing worth pointing out to would be buyers of this product is that if you intend to use the product in dual sensor mode, i.e. sensing air temperature as well as limiting floor temperature to a safe maximum for the type of floor covering, then this product is useless for wood or plastic finishes. In dual sensor mode the minimum possible external sensor setting is 40 degrees C. These floor coverings require a maximum setting of 27 degrees. Ironically, the device can still display any normal floor temperature. I guess this is a firmware shortcoming, so may not apply to all variants.
Hello,
Thank you for the review!
It is far the best!
I would like to ask if you happened to know the pinout of the ribbon cable?
I would like to add a wifi microcontorller to monitor the heating time and later might be would like to take over the relay totally and leave the display just to show temperature so i could remote it from phone and even write scripts for it.
Thank you in advance!
Best Regards,
Gábor
Hi Gábor,
Unfortunately I don’t know the pinout. Neither for the display nor the one from the power supply. I fear you have to take a look at the PCB for that. If you figure it out, either of the two, please post it. Also if you find anything about the power rating of the power supply.
Best, Thomas
Hello Tom,
Thank you! When i have found out, i will be posting it here.
Best regards,
Gábor
hi ,
I have noticed my sensor indicator just reads Air, I installed a floor sensor but now cannot change the thermostat to just the floor option, do you know how to do this? or advise where i can get a copy of the manual?
many thanks David
Hi David,
Did you find how to change it? If no, let me know. If yes, please also let mem know if you came across the same problem as me, and it is that when I use the ony floor option, the display always show Minus temperature.
Hi,
In case you still don’t have it it is here:
https://www.heatnet.nl/th99-engelse-handleiding.pdf
Regards,
Gábor
Well after some tests i am a bit “not delighted”.
It is far from 0,5 °C accurate!
https://imgur.com/a/bvMXI
It was configured with 0,5 °C hysteresis to 24 °C
Was supposed to heat up until 24,5 °C at 9:00
It did heat up to 24 °C then turned off heating.
Then turned on again when temperature was 23,5 °C (of course 24 °C supposed to be) and heated up to 24,7 °C this time.
After that it have consolidated and
On temperature was between 24 °C and 24,2 °C
Off temperature was between 24,6 °C to 24,8 °C
It seems that it has to warm up somehow. afer it did seems to be working ok however also noticed that temperature readin is a bit laggy.
(To validete i have used a temperature logger using DHT-22 digital sensor.)
Have you experienced the same behavior?
Regards,
Gábor
Dear Gábor
I need to limit the temperature of the external sensor to 27C for the laminate floor. Would you please advise me which resistor to use? 40 = 27 🙂 Firmware allows to set temperature from 40C I need 27C
Also the sensor seems to be off!
I mean of course at 25 °C it is 10k
But growing or decreasing much faster then supposed to be!
The 1k NTC thermistor by the documentation has 3380 B value
But it supposed to be around 2200
Am i the only one with this problem?
Regards,
Gábor
I have estimated that it is increasing/decreasing 1,5 time more then supposed to be. Just added 40k resistor paralel and 2 k in line, so still 10k in total but less sensitive. Testing right now. Already looks much better! Will share real resoults
Gábor
Hello,
After some calculating and testing period i think i have found the right resistor values as follows:
R inline = 1,5K
R parallel = 56K
Calculation:
https://imgur.com/a/LfWJw
Difference Graph:
https://imgur.com/a/2EnDT
Theoretic circuit:
https://imgur.com/a/S2kid
Real circuit:
https://imgur.com/a/3dXGG
I hope it helps! 🙂
Regards,
Gábor
Hi Gábor,
Thanks for all that information and how to make the temperature measurement more precise. Any information to improve our setups helps a lot.
Best, Thomas
Well, i have just received a new byc07.50.
This one seems to be working well enough without my change!
Strange alredy…
Regards,
Gábor
Hello, very good article thanks – I have fitted the byc 07.50 today. I am using it only for room thermostat properties at the moment, not time programmed. We have a central heating timeclock in our kitchen – when the heating goes off at 11pm at night it cuts the live power to the upstairs room-stat box where I have fitted this new byc 07.50 – then the display goes blank . well what I wanted to ask if anyone got an idea of how to make the display still show even though the 230v live is dead on the control part of it, maybe by jumper inside or solder 2 points? – its only LCD so should drawer very little battery power if it could remain LCD in the display (obviously if the LED backlight is on it would use too much power) – but if only manufacturer put a rechargeable battery in there , and done firmware whereby no LED backlight available when there is not 230v supply to unit – but still show the LCD information on the screen that would have been better I think.
Hello,
More than 3 years I’m using this thermostat, always happy.
Nobody has tested the wifi version ?
http://www.aliexpress.com/item/Floureon-Smart-Wi-Fi-Programmable-Digital-Touch-Screen-Thermostat-HY03WE-4-Wifi/32826872954.html
Best regards,
JC
HI, I fitted 4 of these to our four rooms. and they all seem fine, but one remains illuminated all the time, in a bedroom which isn’t good – can some me how to switch this off, and where I can get an instruction book ,thanks Robin
Hi Robin,
Sure turn off the thermostat and turn it on again and enter the setup. To enter the setup, while turning on and while the byc greeting is visible press the book button (the button to activate the daily schedule in case you have a clone with different icons). You should see an entry Adj to adjust the temperature setting. Now use the book button to cycle through the options. When you hit the bL option (backlight), ensure it is off.
Best, Thomas
Hi Tom, I hope you are still out there …. I have 2 (quite new) of the underfloor thermostats you featured ( C07.H3). Neither of them hold my settings if there is a power cut. Any ideas?
Pete in SW France
Hi Peter,
There is a battery inside on the PCB that helps the unit to keep the settings. The type of battery you need is CR1220. Hope that helps.
Best,
Thomas
Great article, I newly moved into an apartment and have these thermostats around the place. Mine all seem to say ER . 1 (error) do you know how I fix this? Any help would be great, thank you.
Hi Shakera,
Sorry have not heard about that error message. In case you do figure out, would you mind sharing here.
Thanks, Thomas